ICS 2012
Convention: Pilot Companion Ground School
|
||||||||||||
|
||||||||||||
IntroductionThis document is a textural version of the material presented at the 2012 ICS Convention in Baltimore. The intended audience was the non-pilot flight companions of ICS members. Those attending received a handout of the material contained below, and participated in a series of PowerPoint slide presentations illustrating the process. The images contained in this document are from those presentations. The material is presented to provide an insight to the process of planning and executing a typical flight in a Piper Comanche. The point of view is that of the pilot and the thought process and actions the pilot goes through for each flight. The intent is to give you, the non-pilot, an understanding of this process, and to encourage you to become involved in the process in some way - to move from just being a passenger to becoming a true pilot companion. It is not our intent to make you a pilot - merely reading this material cannot do that - but to provide a knowledge background, which will encourage your active participation in all phases of the flight. We hope that, in this way, your next flight will be like watching your favorite movie one more time. You already know the plot to the story, you can almost recite the dialogue, and you can appreciate all the tiny nuances as the story unfolds.
First, let us talk about some basic principles of flight.
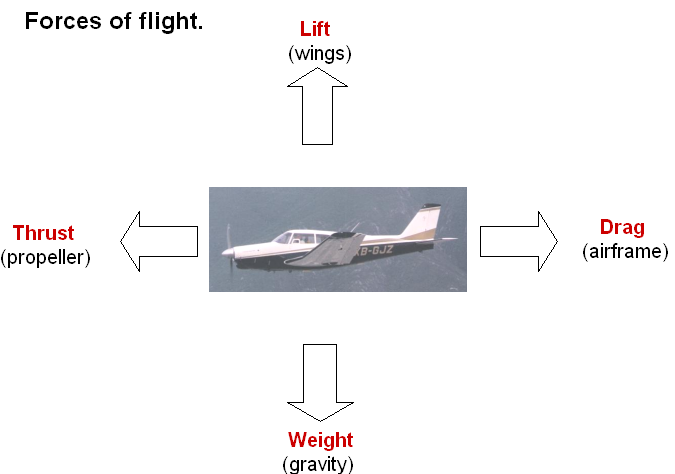
The four forces of flight are lift, thrust, weight and drag. To maintain flight, all four need to be in balance. The wing is an airfoil, which, once a critical speed is reached, provides sufficient lift to maintain the aircraft above the ground. In simple terms, the more speed the more lift is available. The propeller is also an airfoil, providing thrust or �lift� in the forward direction. Many factors contribute to the amount of thrust available � the speed or RPM and the blade angle being two. When you provide an excess of thrust the aircraft will climb. When you decrease the thrust the aircraft will descend. Drag is the result of moving the aircraft through the air. While the shape of the aircraft works to minimize this drag, every little extension contributes a little. The very action of creating lift over the wings creates drag due to the disrupted air. Weight is, of course, the action of gravity, which must be overcome by creating lift. However, with enough thrust to overcome drag and to create lift, the aircraft will fly. When all these forces are in balance you will have level flight.
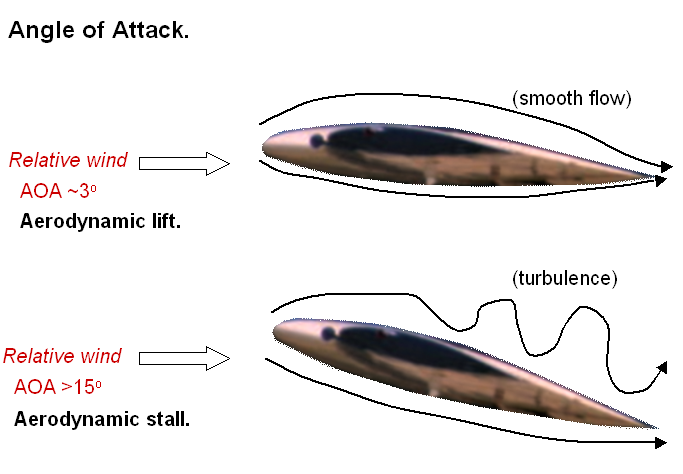
The angle of attack is critical to producing lift. This is the angle formed by the centerline of the airfoil�s leading to trailing edge and the relative wind or air it is passing through. As the wing moves, it separates the air, causing it to go over and underneath. The air passing over the wing must go faster to rejoin at the trailing edge. This increase in speed results in lower pressure above the wing, creating lift. A certain amount of lift is also produced beneath the wing by the wedge effect of the angle of attack. At higher speeds lift is produced at a low angle of attack and the airflow is smooth. As speed is reduced, more and more angle is required to produce sufficient lift to maintain flight. At some point the angle of attack becomes so great that the airflow becomes disrupted, and separates from the upper surface of the wing. The amount of lift being produced can no longer support the aircraft, a condition known as aerodynamic stall. The wing simply stops flying and the aircraft falls. Recovery requires lowering the nose and increasing thrust to reduce the angle of attack and increase speed. Next we will look at the various parts of the control panel � the flight instruments, radio communications, and the power quadrant.
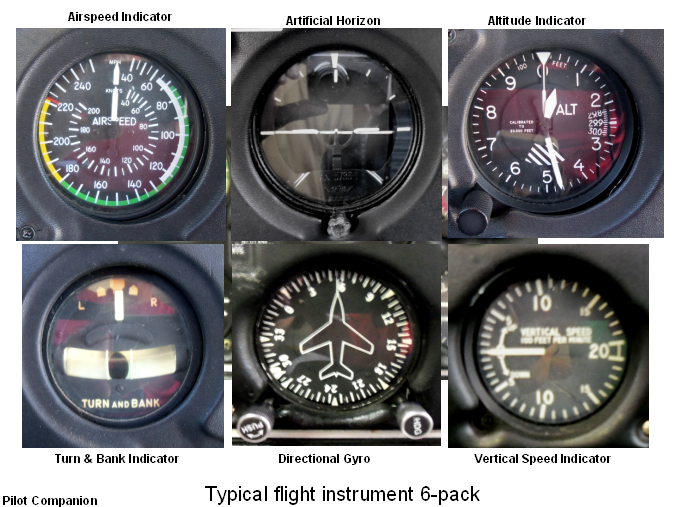
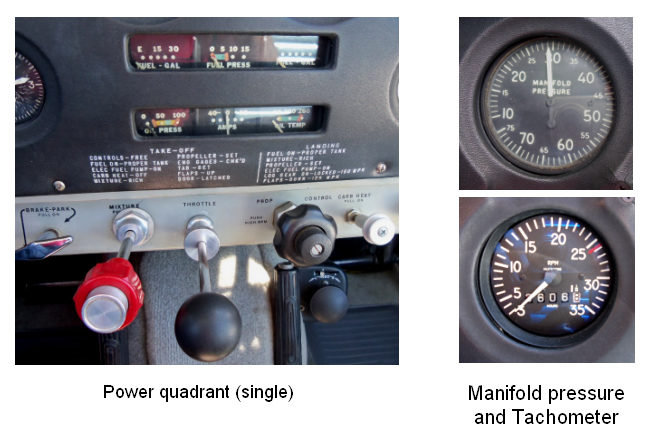
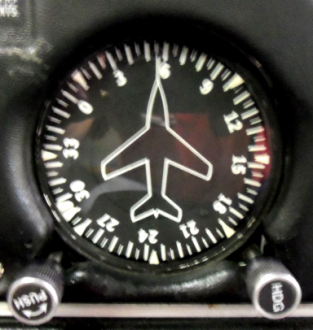
The flight instruments, often referred to as the 6-pack, are located in the panel directly in front of the pilot. They consist of the airspeed indicator, artificial horizon, altitude indicator, turn and bank coordinator, directional gyro, and vertical speed indicator. The altitude indicator (upper right) has a knob to set the local atmospheric pressure, ensuring accurate readings of the altitude above sea level. The local altimeter setting can be obtained from ATC or from nearby AWOS or ATIS broadcasts. The directional gyro (bottom center) has a knob to adjust the readout to match the magnetic compass heading. This is done periodically to correct any drift due to gyro wear. There may also be a second knob to adjust the heading bug, a colored arrow indicating your desired course heading. If the autopilot is in use the aircraft will now turn to the new heading.
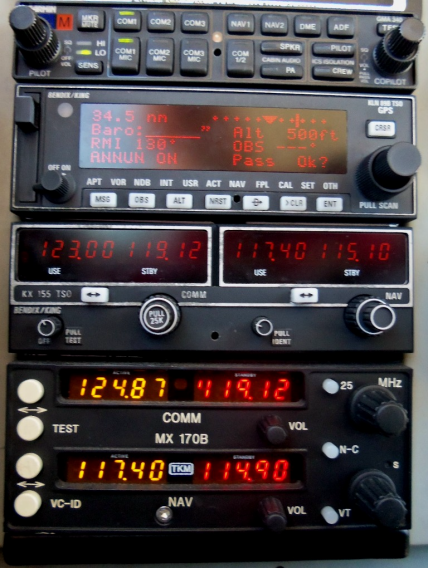
This photo shows a typical radio stack as found in an older Comanche panel. At the top is a communication panel that provides a cabin intercom as well as access to the various radio communications. The three buttons left of center select the active radio for communication. The top row buttons allow monitoring of additional sources at the same time. Currently Com1 is selected. The top buttons right of center allow monitoring of the navigation channel(s) for their identifier or other broadcast information. The lower right buttons select where the audio is sent, to certain headphones or the cabin speaker. The large knobs control the volume and squelch, the left for the pilot and the right for the rest of the cabin. Below that is a GPS unit. In this model the large knob on the right accesses the various display pages and selects the input information. The displays provide textural information as well as a graphical map of the flight path. The current desired heading can be directed to the VOR indicator as well as to the auto pilot. Next, in the middle of the stack, is the Com1/Nav1 radio. The left side shows the current and next radio frequencies. The next one is set using the large knob, and switched using the white flip-flop button. The right side are the navigation frequencies, current and next. These can be set for VORs or approach guidance frequencies, and are connected to the VOR indicator. This stack has a second radio � Com2/Nav2 � again with the radio frequencies in the top display and the navigation frequencies in the bottom display. The active Nav/Com, 1 or 2, is selected using the communication panel at the top of the stack.
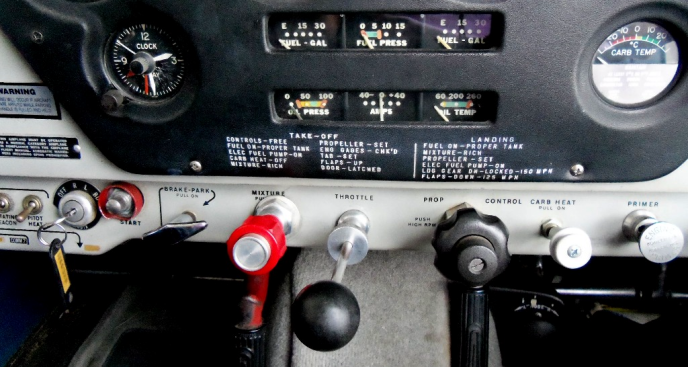
The power quadrant is located in the lower center of the panel, and consists of the mixture control, the throttle, and the propeller RPM control. In the photo the engine status gauges are shown just above the power quadrant. The red mixture control sets the amount of fuel available for the fuel/air ratio. Generally the knob is pushed in for maximum fuel available when near the ground, such as for takeoff and landing. This provides maximum power without overheating. As the altitude increases a reduced mixture, a process called leaning, allows the engine to run hotter and therefore more efficiently. The throttle control adjusts the amount of air to the engine, thereby controlling the power. Pushing it in gives more power, and pulling it out provides less. Movement of the throttle shows up directly on the manifold pressure gauge, which can be used to achieve a particular power setting. The propeller control adjusts the governor, which in turn adjusts the angle of the propeller blades. At full power � prop control all the way in � the blade angle is relatively low and the RPM high at full power, providing maximum thrust for takeoff and climb. As the propeller control is pulled out the blade angle is increased, taking a bigger bite of air as the blades turn. This requires more power from the engine and results in lower RPM. Lower RPM means less fuel being consumed for a given airspeed and better economy. Adjusting the mixture to bring the combustion temperatures up further improves efficiency. |
||||||||||||
Part 1: Flight PlanningThoughtful flight planning is the key to an enjoyable flight experience, both for the pilot and for the passengers. While not every action in the following paragraphs is required for every flight, all of them need to be considered and checked off. First is the flight objective. Is this to be a daytime flight out and back to some point of interest, or a more extensive flight with intermediate stops and possible hours of darkness? Are there any constraints on the flight, such as a reservation or meeting with someone at the destination, bringing other passengers, or a need to be back home by a certain time? For the time frame of your planned flight, are there any typical weather conditions you may see, such as reduced visibility due to morning fog or daytime haze? Will seasonal daylight time or temperatures impact your flight? Can you truly go whenever you are ready, or even decide to not go?
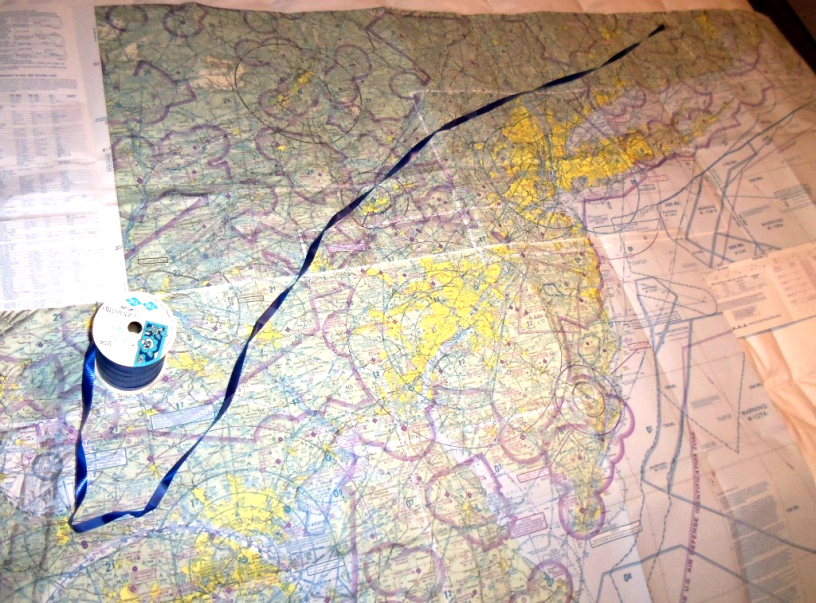
Next is the aircraft and pilot. How long since the aircraft�s last inspection? Is it in top shape? Have there been any recent problems (squawks)? Are the charts and the GPS database current? If your trip will involve flight over water, do you have adequate flotation equipment on board for all passengers? Will you need chocks or tie-downs to secure the aircraft at your destination? What recent experience does the pilot have in this aircraft? Is the pilot current per the regulations (landings, night, IFR)? Now make a plan for the route of flight. Lay out the required chart(s) on a large surface (a table, a bed, or even the floor) and locate the departure and destination points. Scan the direct route of flight for any obstacles or areas you wish to avoid such as high elevations or controlled airspace (Class B or C airports, Warning or Restricted areas), and possible TFRs. Choose a cruising altitude using the hemispherical rule (even thousands westbound, odd thousands eastbound, plus 500 feet if VFR). Consider flying high where the air is cooler and smoother, the aircraft performance (speed) is better, and obstacles are far below.
Draw the planned route on the chart (pencil line, highlighter, or even a piece of string and tape). Mark your navigation waypoints with circles or small post-it notes. Visual waypoints like rivers or nearby airports can also be marked. List your waypoints by their identifier and related frequency on a flight plan form. Using your sectional scale, determine the distances between waypoints and the magnetic headings to follow, adding these to the form. Total up the distances to calculate the flight time and fuel required based on your cruise speed and fuel burn rate.
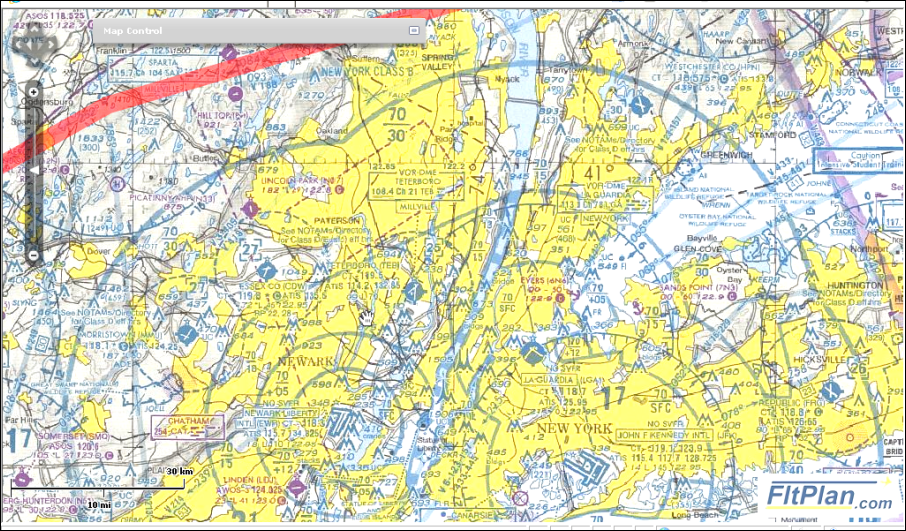
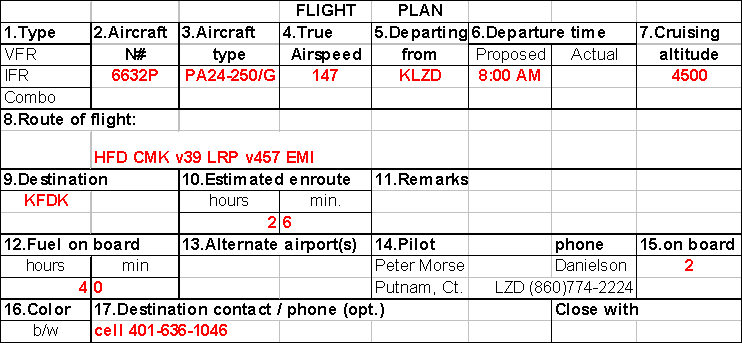
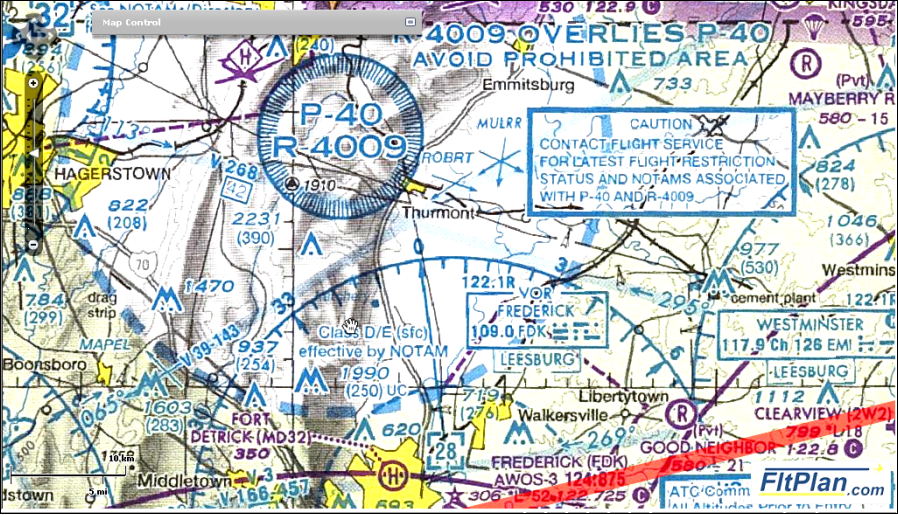
Fill in the route of flight block on your flight plan form. This defines your flight when talking to a briefer or calling up DUAT. When possible, use the Victor airways to define entire segments in a simple way. For example, a flight from Danielson, Ct, (KLZD) to Frederick, Md. (KFDK) involves flying to HFD, CMK, SAX, ETX, LRP, VINNY, and EMI. This route description is shortened to HFD, CMK, v-39, LRP, v-457, EMI. As an extreme example, flying from Poughkeepsie, NY to Sun �N Fun at Lakeland, Fl can be defined as IGN (Kingston, NY VOR), v-157, LAL (Lakeland, Fl VOR). All of the waypoints down the east coast are then filled in automatically. Now that you have your plan ready, open your favorite computer program and store it for future reference. Once in place in the AOPA flight planner, FltPlan.com, or in your DUAT account, you can reload it with simple mouse clicks to see the current weather and NOTAMs along your route as part of your pre-flight briefing.
Now you can let your finger do the walking. Follow the flight path with your finger from start to finish. Note any airports within two finger widths (~8 miles) to the right or left as check points along the route and possible landing sites should you need to divert. In particular note airports with published ATIS or AWOS frequencies as sources for enroute weather. Note any restricted areas you will pass, such as P-40, and check for details on the chart margin. Also note any posted Approach frequencies to be used when nearing controlled airspace.
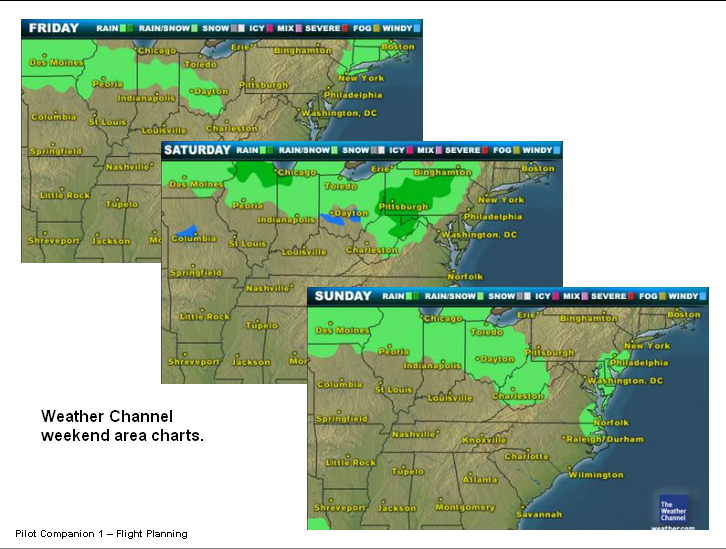
In the days leading up to your flight pay attention to the area weather patterns. The Weather Channel website is a good source for this information. Choose locations near your flight path and click on the extended forecasts � 5 day, 10 day, weekend � paying particular attention to the area forecast maps. Understanding the movement of the forecast weather cells can help you with a go / no go decision for your flight, or to modify your departure plan. If at any point something just doesn�t look or feel right, consider modifying your plan for the flight. Maybe it just is not a good day to fly.
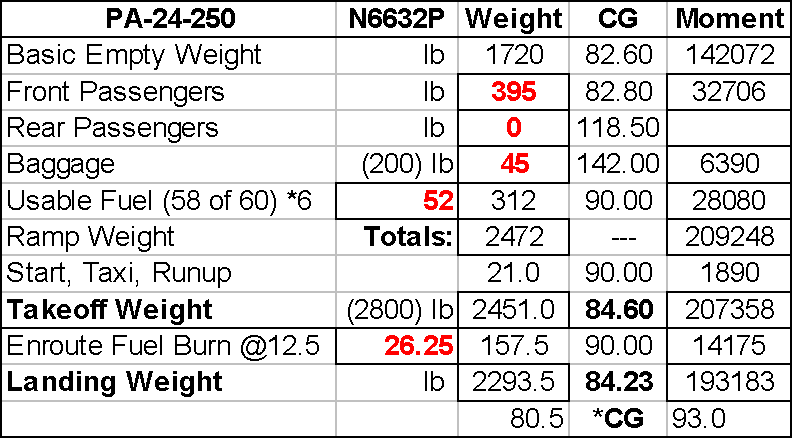
Do a quick weight and balance calculation for the flight, using your planned fuel loading and the approximate weights of your passengers and baggage. Don�t forget the stuff you �always carry� like tie-downs, chocks, extra oil and your flight bag. Calculate your landing CG after subtracting the expected fuel burn.
|
||||||||||||
Part 2: Pre-Flight activitiesBefore the flight, consider the possibility that you may not complete the flight as planned, perhaps landing at a different airport or delaying your return overnight. Pack an overnight bag with basic toiletries and at least one day�s supply of any required medication. You could also bring a basic change of clothes. Include a list of contacts and the charger for your cell phone. Gather together all the materials (paperwork, charts, hand-held radio, spare batteries etc.) that you will need in the cockpit for the flight. Review the flight plan and open the charts to the appropriate places. Starting from the destination, work your way backwards to the departure point, folding and/or flipping the chart(s) as needed. You will end up with the first chart on top, and a fresh look at the route.
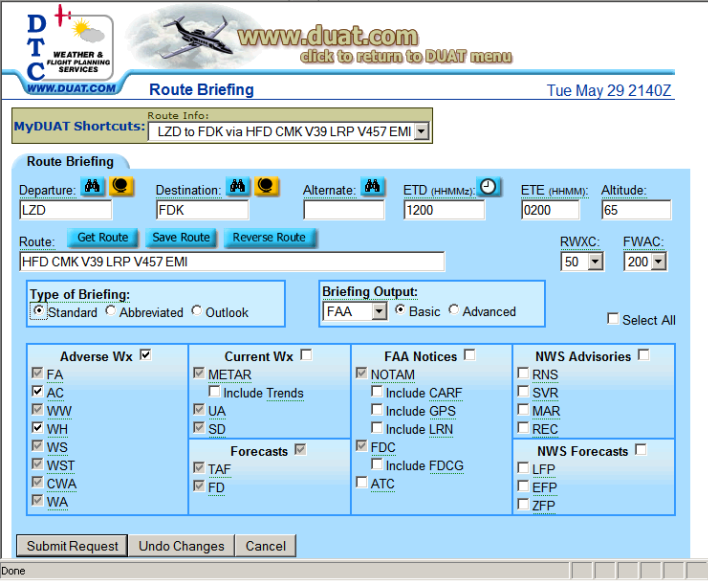
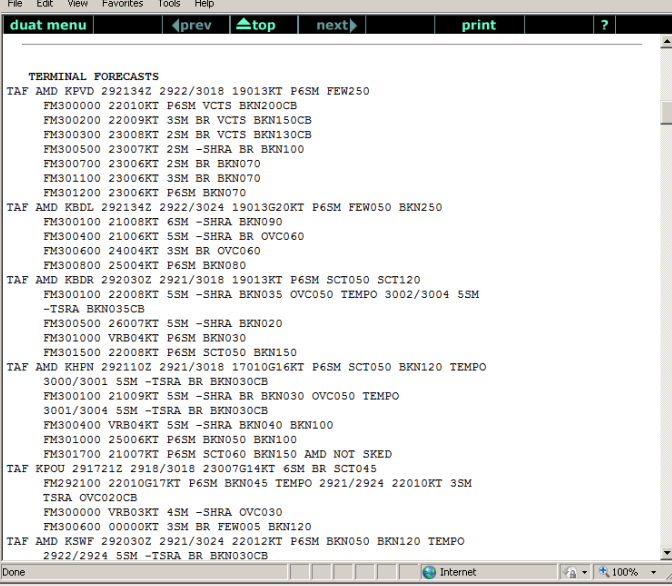
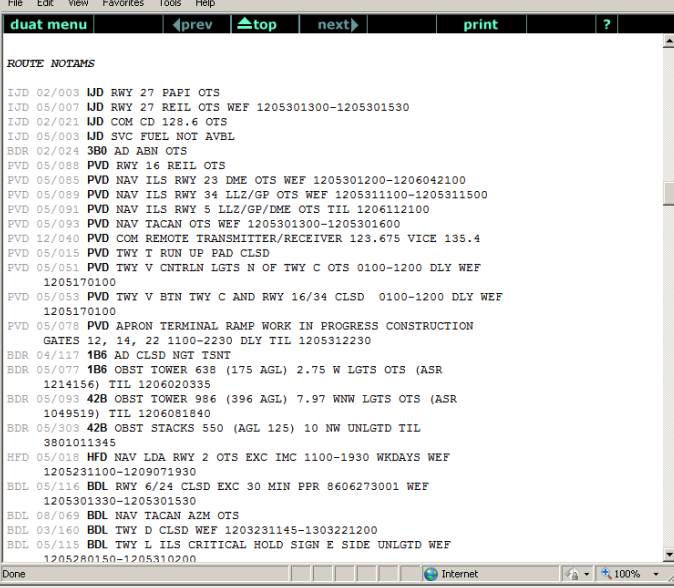
Get a good briefing. Call up your flight in DUATs (you did save it, right?) and click to request a standard briefing. Read the result, paying particular attention to the area forecast for the time of your flight, and to the list of NOTAMs for your departure and destination airports. The Terminal forecasts (TA) along your route will give you the surface winds and cloud cover for that immediate area. Use this information to adjust your cruising altitude. The Winds Aloft forecast (FD) will give you an indication of the possible head or tailwinds that will affect your ground speed and time of flight. Scan through all the NOTAMs, noting any that seem important or which need clarification. You can also look at METARs, reports of the current weather along the route, but remember that these reports do not indicate the weather you will find when you arrive. They can, however, help in judging how fast a layer is burning off. When you are ready, call Flight Services (800-WX BRIEF) and file your flight plan. Verify your DUAT information with the briefer. Ask particularly about any TFRs near your route, and about any NOTAMs that you have questions about.
Preflight the aircraft as outlined in the POH. Work your way systematically around the plane, removing tie-downs and covers as you get to them. Look for missing or loose screws and any new dents. Pay attention to stains: light blue stains under the wing could indicate a fuel leak, dark stains under the nose cowl could indicate an oil leak. Testing the fuel for water content is a two-person job � one underneath to collect the sample, and one in the cockpit to change the fuel selector. While beneath the aircraft, check the landing gear and conduits for grime or wear. Open the cowl and look for fresh oil coverage. Gently wiggle all hoses and wires to check connections. Check the oil level and decide whether or not to add oil. Check all fuel tanks with a dipstick / sight gauge and write each resulting amount down to compare with the fuel gauge reading on startup. Preflight the cabin. Has it been cleaned out since the last flight? Are the headsets and seat belts ready for use? Stow the flight paperwork (charts, AFD, approach plates) in their proper place for use. Stow any baggage in the rear, packed in such a way that it will not shift around in flight. Remove any heavy or solid objects from the rear hat shelf � they will become projectiles in the event of a sudden stop. Assure that all windows are clean. If not, clean them! A bug on the windshield could be mistaken for another aircraft, or worse, it could hide one from view. Preflight yourselves. [IMSAFE: Illness Medication Stress Alcohol Fatigue Emotion] Are you feeling okay? Are you well rested? Are there any medication issues? Do you have a clear picture of the flight you have planned, and a preplanned list of options in case things don�t go as planned? Do you need to adjust your personal weight and balance (you�ve had how many cups of coffee?)? Your flight requires an hour of reserve fuel to be safe - do you have that extra hour too? Brief your passengers on the flight they will be part of. Explain the flight time, your chosen altitude, the general route of the flight, what weather to expect (particularly if flying IFR), and any possible deviations from the plan. When all are seated, brief on securing the door, the use of seatbelts, emergency exiting, and the concept of a sterile cockpit. Part 3: Startup and TaxiEvery aircraft has its own idiosyncrasies when it comes to starting the engine. The pilot/ owner will be adept at coaxing the engine(s) to life. The POH gives specifics as to priming the fuel, setting the mixture etc.
When ready, set the parking brake or stand on the toe brakes, and �clear� the area. Once the engine is running turn on the electronics. Verify that the rotating beacon is on and operating. Set the radio and navigation frequencies for the flight while the engine is warming up. Listen to the local ATIS or AWOS for departure information (this also confirms radio reception). Set the altimeter to the broadcast setting and confirm that the readout matches the airport elevation. If you are parked parallel to a runway you can set the directional gyro (DG) to that heading. Otherwise set it to the magnetic compass heading. Enter, or call up, your GPS flight plan if you intend to use one, or simply enter your first GPS waypoint. Sweep the panel visually to be sure that all switches are on that should be on, and that the engine readouts are good. Confirm that the fuel gauge reading(s) agree with your known fuel quantities. Note the engine start time for fuel management purposes.
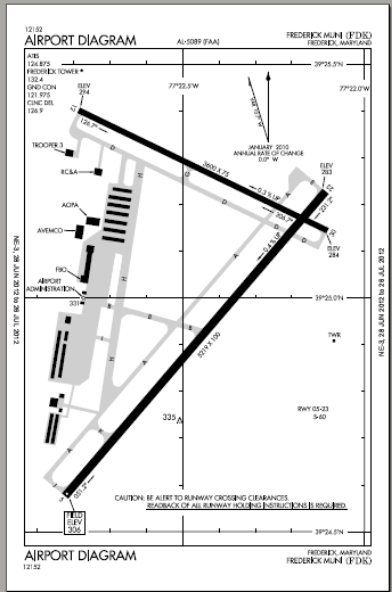
When you are ready, call ground control for your taxi clearance. Tell them who you are, where you are, and what you want to do. Write the instructions down and then follow the route with your finger on the airport diagram as you taxi. Taxi calls are a good idea at non-towered airports too. Again, broadcast who you are and what you are going to do. While you taxi, pay attention to the flight instruments. As you change direction, the DG should change to match your current heading. So should the magnetic compass after settling down from its lead / lag activity. If the airspeed indicator comes alive you are taxiing way too fast! Keep your eyes outside the cockpit. Do not tune radios or organize charts while taxiing.
Pull over in the run-up area, or when you are nearing the
entrance to the active runway, to do a power check on your engine. As
per the POH, bring the power up to the desired RPM and confirm that the
engine gauges (fuel pressure, oil pressure and temperature, amp meter,
vacuum) are reading correctly. Perform the magneto checks - left then
right � to confirm operation. A slight drop in RPM is expected. A
significant drop or rough engine sound may indicate a fouled plug. This
may be cleared by running for a time with the mixture leaned. If the
rough running does not clear up, takeoff is not advised. Cycle the
propeller control a couple of times to confirm the operation of the
governor. You should hear the engine slow down, see the RPM needle move,
and also see a drop in the vacuum or manifold pressure.
If you are departing on an IFR flight plan, now is the time to call for your clearance. Some pilots call before they do the run-up knowing that there will be a delay in ATC clearance delivery. At any rate, be ready to copy down your clearance when they do call back, even if you must interrupt your present activity. You are now ready to depart. Brief your passengers on the departure plan and remind them of the sterile cockpit concept. One more scan of the panel, stow the taxi diagram, and call the tower for permission to enter the runway for takeoff. |
||||||||||||
Part 4: DepartureOnce the run-up is complete, brief your departure procedure, including your abort procedure, to yourself and to your passengers. Confirm the settings for flaps and trim. Scan the runway � approach and departure � one last time to insure no conflict. Contact the tower for departure clearance, or broadcast your intentions on the CTAF. When directed, move into position on the runway. Confirm that the DG heading matches the runway heading and that the altimeter matches the field altitude. Note the time for fuel management.
Apply the brakes and bring up the power smoothly, using full propeller RPM and full mixture. Scan the engine readouts for any anomalies. If everything is �go�, release the brakes, apply full power, and track down the runway centerline. Use right rudder to counteract the left turn tendency and slight aileron input to lean into any crosswind. Once airborne the aileron input might be reduced, but the right rudder control might need to be increased. Climb smoothly, adjusting the trim to reduce the force needed on the yoke to maintain pitch angle. Once 200 feet above the runway, or beyond the point of landing, raise the landing gear and re-trim. Turn on course as directed or upon reaching pattern altitude. Trim the aircraft and adjust the propeller RPM and mixture as needed. Switch to the departure frequency as directed or when safely beyond the VFR airport environment. Scan the sky! |
||||||||||||
Part 5: Cruise FlightIf you have an autopilot, use it. While it is satisfying to hand fly the aircraft, it is much more relaxing to let �Otto� do it. But don�t get complacent! Double check that the inputs are correct and monitor your progress. If assigned a new altitude or heading, know how to enter them, or how to disengage the autopilot to comply. Follow the flight path on the chart(s) with your finger, checking off the waypoints as you reach them. Assure that the actual flight time agrees with your expected times, as does your fuel usage. Be aware of possible landing sites nearby, either by looking out the window or on the chart. Monitor the panel readouts for engine parameters (power setting, oil pressure, temperature, charging), flight parameters (altitude, heading, speed), navigation (VOR frequency and radial setting, GPS waypoint), and communication. Confirm that the next setting, if known, is preset. Monitor the fuel gauges and timer, switching tanks at the predetermined time and recording the change. Pay attention to the changing cloud patterns, especially if flying VFR. Big, solid looking clouds need to be avoided, both because of the view they block and for the increased convective activity that forms them. A thin layer of clouds will form where the warm, moist air rising from below meets a cooler upper area. Below this layer the air will be bumpy, probably all the way to the ground. Above it the air will be much smoother, inviting you to a smooth cruising flight. As the amount of moisture increases in the rising air, the density of the cloud layer formed will increase. Cloud cover where less than 40% of the sky is covered is described as few or scattered, and finding a hole large enough to climb or descend through should be no problem. Cloud cover between 40 and 60% is called broken, and classified as a ceiling. Transitioning through is not allowed under VFR flight rules.
You should not continue flying above a layer that is increasing as you may be trapped without a large enough hole to descend. If you are nearing your destination you may be able to request an IFR clearance to descend, or ask ATC or Flight Watch for the nearest VFR weather area. It is never a good idea to descend blindly through clouds, even if you can see the ground between them. It is not the ground that will run into you, it is the other aircraft that you cannot see. Keep cabin conversations under control. You are not a Hollywood tour guide. Pointing out interesting places as you pass them is good, keeping the passengers aware of the land beneath them, but too much yakking can mask ATC communications. Be ready with the �wait one� raised finger to stop conversation for radio calls. If your passengers insist on chatter, consider using the Pilot Isolation button to remove yourself from distraction. And always, whether flying VFR or under ATC control, watch for other aircraft. |
||||||||||||
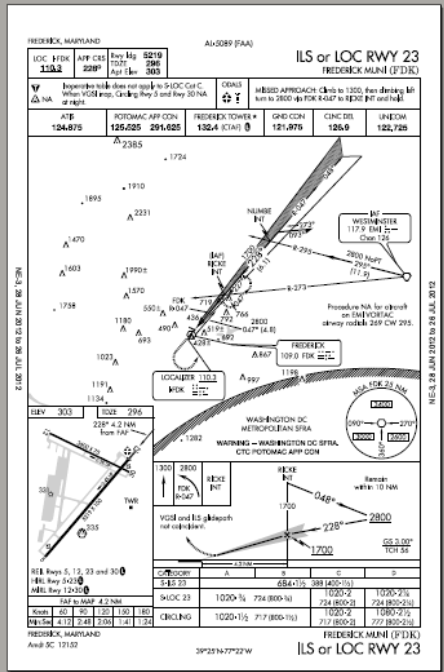
Part 6: ApproachAs you approach your destination, begin to collect current information about the airport environment.
Get the current weather (ATIS / AWOS) at about 20 NM out. If possible, use Com 2 for this so that you will not have to leave your current communication frequency. If you are talking to ATC and must leave the frequency, tell them what you wish to do and when you will be back. Get the weather and then check back in with ATC. Preset the approach frequencies � tower or CTAF, localizer � and have any approach plates ready for use, including the taxi diagram. If flying VFR, listen to the CTAF calls to get a picture of the local traffic. Brief your landing - power settings, flaps, speeds � and the changes needed to arrive at those targets. Brief your plan should you be unable to land on the first try. What is the published missed approach procedure for the approach you will be flying? Is there an alternate missed approach you can negotiate with ATC? Is there an alternate airport nearby with more favorable conditions � longer runway, better weather or lighting, or fewer crosswinds? Descend to the published traffic pattern altitude (TPA) or as directed by ATC. Reduce power, add flaps, and trim for approach speed, normally around 90 MPH. Bring the propeller up to full RPM and adjust the mixture as needed. If your flight is VFR into a non-towered airport, give your position on the CTAF relative to the airport when 10 and 5 NM out. Fly to a position to enter the 45 to the downwind of the active runway. Enter the traffic pattern at the correct altitude - usually 1000 feet AGL � and speed, announcing each segment as you move around it � �downwind�, �base� and �final.� If with ATC, follow their instructions for heading and altitude. Report when you have the airfield in sight. Switch to the tower or CTAF when directed.
In the pattern, before you turn final, perform the pre-landing GUMPS check � Gas switched to the fullest tank, Undercarriage down and locked (green light), Mixture full rich, Propeller maximum, Set up for landing (flaps, power, lights). Some pilots lower the gear when on downwind, others wait until turning final. Lowering it at the last minute may mean having to go around if there is a problem. Lowering it sooner leaves more time to correct, and the gear also acts as a speed brake while descending through base and final. The approach is completed when you are on final on speed and on altitude and in a position to land the aircraft without excessive maneuvering. If at any time you are unable to continue the approach � weather issues, expected crosswind too high � break off, announce to ATC or on CTAF, and begin your alternate plan. |
||||||||||||
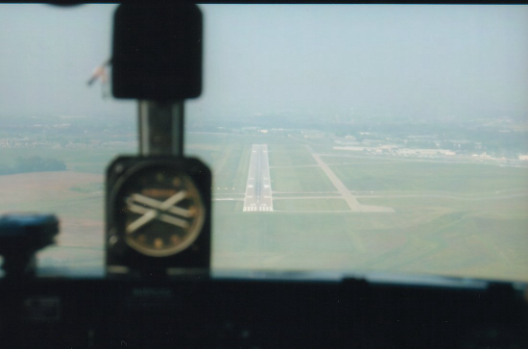
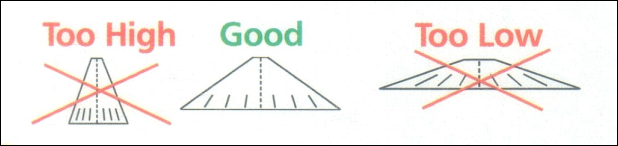
Part 7: Landing
Once you are on final, check that the runway picture ahead of you looks �right.� If the runway appears to be flat ahead of you, like a continuation of your flight path, you are probably too low. Add power to slow your descent (climb) until it looks better. If the runway looks like the bottom of a steep hill that could smack you in the face, you are probably too high. Reduce power to descend at a greater angle (or go around and try again). If there are any landing aids (PAPI lights, ILS glide slope) use them � they will tell you if you are too high or too low. If you do decide to go around, do not change your mind. Add full power, level the aircraft and, once you have established a positive rate of climb, reduce the flap setting. Raising the gear is optional, but if you do, don�t forget to lower it again for the next landing. Climb along the runway heading to the pattern altitude and reenter the pattern on the crosswind. Announce to the tower or on CTAF what you are doing at each step of the way. Be aware that there may be other traffic and that you are no longer �first in line� for landing. As you approach for landing, stay on the extended centerline of the runway. Use pitch to control your airspeed and power to control your descent. Point the plane such that it tracks straight to the landing spot, even if the nose is pointed off to one side a little. Use some aileron to lean into a crosswind to stop your drift, and opposite rudder to straighten the nose back to the centerline - this is called a slip. Use the trim to help with the load on the yoke. As you near the runway bring the power back some more and slowly bring the nose up to bleed off more speed, reducing from the final of 75 to 80 MPH to about 65 MPH. Once the runway is assured, bring the power all the way back and gently raise the nose, but no further than it would be when sitting on the ground. The plane will fly all the way to the runway, landing gently. Once down, with the power still all the way out, hold the yoke all the way back and apply the brakes. This nose-high attitude puts more weight on the main gear, where the brakes are, and helps to aerodynamically slow the plane. Don�t forget to now steer with your feet, straight down the runway. When you have reached taxi speed, add a little power and taxi to the next runway exit. Don�t fiddle with any knobs or buttons until beyond the runway hold short markings and onto a taxiway. At a towered field you will be told to contact ground control. Acknowledge, taxi clear, and then switch over. |
||||||||||||
Part 8: Taxi and ShutdownOnce you are clear of the runway, stop and clean up the aircraft � turn off any unnecessary lights and electronics, raise the flaps, and crack open the door for fresh air. Contact ground and tell the where you wish to go for parking. At a non-towered airport, announce on CTAF that you are clear from the runway and where you are going next. Taxi to parking as directed, again following along on the taxi diagram with your finger. Keep the engine RPMs up a little bit to help in cooling it down, controlling your speed with the brakes. It is a balancing act � not too much of either. Once in your parking spot, hold position with the brakes. Turn off all electronic devices, leaving on the rotating beacon and the master power switch. If the navigation lights were on for night flight, turn them off too. Kill the engine by pulling the mixture control all the way out. Once it has stopped turn off the magnetos with the key and turn off the master power switch. Secure the aircraft with chocks and/or tie downs. Arrange with the FBO for any services needed. And, before you leave, give your aircraft a nice pat on the cowl for another job well done. |
||||||||||||
Part 9: Meet the POHEach aircraft has an instruction manual which provides general information on how to safely operate the aircraft, with various methods for takeoff, cruise and landing, as well as specific limits for loading, flight conditions and emergency procedures. The original manuals were in a narrative format, intended for armchair reading, and introducing the pilot to the aircraft and its performance characteristics. Most assumed that the pilot was already well versed in navigation and basic stick and rudder skills. The FAA determined that what pilots needed was a ready reference in the cockpit detailing the many tasks and procedures for operating a particular aircraft, in particular when faced with an aircraft emergency. The result was a standardized format for the Pilot�s Operating Handbook, the POH. The new POH format is divided into sections, with each part separated by a tabbed sheet for easy location.
Section one - General Information - includes aircraft diagrams with labels and dimensions, weights and capacities, performance numbers, a glossary of terms and abbreviations, and a listing of conversion factors. Section two - Limitations � lists airspeeds, critical performance instrumentation readings, weight and balance and center of gravity (CG), and structural loading in flight. Section three - Emergency Procedures - deals with engine power loss, electrical failures, executing a power off landing, various engine operations, and manual gear extension. Section four - Normal Procedures - presents tables of airspeeds for safe operation, and check lists for preflight, starting, taxi and run-up, takeoff and climb, cruise and descent, approach and landing, and shutdown. Section five - Performance - has the tables used in preflight planning to calculate takeoff and landing requirements, and for in-flight time and fuel burn. Section six - Weight and Balance � is for these calculations. The actual values for your aircraft will be listed here, along with an example of an actual calculation for a flight problem. If any changes are made to your aircraft, be sure to update these pages with the new weight and balance information. Section seven - Systems - presents a description of each system in the aircraft, such as fuel, electrical, pito-static etc. These descriptions are followed by detailed diagrams of each system. Section eight � Maintenance - gives specific information on the care and feeding of the aircraft. Included are the inspection periods, ground handling, preventative maintenance, cleaning specifics, and required paperwork. Section nine � Supplements - is a collection of new information about the aircraft that was added after the original POH was published. Section ten - Safety Information - presents good material for the pilot. There is a discussion of pilot physiology, pilot proficiency, and weather issues that may affect safety of flight. Find that comfortable armchair and become familiar with the contents of your POH. Then stow it the aircraft, in a location handy to the pilot, for that occasion when you need an answer quickly. |
||||||||||||
Part 10: What else can go wrong?
We have presented a lot of information so far, much of it needing attention to conduct flight safely. But what about those other times when something unexpected comes up? What do we do? Where do we go for help? What about weather issues? If you have a source of in-cockpit weather information (an Ipad, XM weather, storm scope or radar) use it to adjust your flight path. If talking to ATC (IFR flight plan or VFR Flight Following), ask them what they see and ask for suggestion or vectors around it. For the big picture of what lies ahead contact Flight Watch on 122.0. Their specialty is flight weather. Just remember that you are the Pilot in Command (PIC) � if you don�t like what you are seeing out the front window, then change what the aircraft is pointing at. Remember to tell ATC what you are doing and why. What if you need to divert � to change where you intend to go for a specific reason? This is why you have been following your flight path on the chart. Pick a convenient airport and go there, always working it out with ATC if you are talking to them. You may need to divert because of weather ahead, or low fuel, or for personal comfort needs. The GPS �nearest� button can provide a lot of information about your new destination.
What if you become lost? This can happen surprisingly easily, particularly at night, or when you are paying attention to things inside the aircraft while changing direction and lose touch with the view outside. First, align your world inside the cockpit with the one outside � position your sectional map so that �up� is your current heading. Then look for the big landmarks � rivers, lakes, highways, cities, and other charted features. Look both ahead and off to each side. If you still are not sure, try climbing for a wider view. Refer to your GPS to identify nearby airports. Remember that the GPS shows you the current course line and the ground track you are flying. This may not match where the nose is pointed as this is affected by the crosswind component of the air you are in. This correction factor becomes more obvious when you are looking for your destination airport �straight ahead,� when it is actually 5 or even 10 degrees to the left or right of the nose due to the winds. If you are not talking to ATC, give them a call. Tell them where you think you are, that you are not sure, and where you would like to go. They will give you a transponder (squawk) code, identify you on radar, and assist you in any way they can. If you can�t use the local controllers, try Flight Watch on 122.0. And what about the big items � engine power loss, electrical failure, loss of flight or navigation instruments, or fire in the aircraft? First, make a plan to deal with your problem, and then declare an emergency. If talking to ATC, stay with them; if not, switch to the emergency frequency of 121.5. Broadcast �Mayday, Mayday, Mayday!� followed by who you are (aircraft identifier), where you are, what has happened, and what you are doing about it. Fly the plane, and then answer any questions ATC has. If you have a loss of electrical power and the engine is still operational � it can run just fine without electrical power � maintain your altitude and heading and try to reset the affected circuits. If you cannot continue your flight safely, find a nearby airport and land there. If you loose your radios � communication and navigation � switch your transponder code to 7600 � �lost com� � to make ATC aware of your problem, then land at the first opportunity.
And what if (OMG!) you lose your pilot? The material presented above can give you a much better understanding of the art of flying an aircraft � controls, communications, and procedures � but is no substitute for real hands-on experience. At every opportunity, with your pilot�s guidance, take part in the flight activities. Preset the radio and navigation frequencies. Program the GPS. Handle some of the communication. Control the aircraft on the ground or in flight, adjusting the power or trim as needed. Track the flight on charts, picking out landing options as they come along. Take the opportunity to view the AOPA �Pinch Hitter� course on line � it presents much of the above material � and then sign up with a flight instructor to go fly in your aircraft, learning how to bring it in for a safe, controlled landing. Once you have accomplished all of these things, give yourself a great big pat on the back. You are now unique among aviators. So, now, where will you go on YOUR next flight? < Click here for the Temporary Co-Pilot Checklist as adapted from the ICS "Comanche Tips" >
|
||||||||||||
Glossary of Terms
� MASTER � turns on electrical power (battery) � ALT � connects alternator for charging battery � FUEL PUMP � turns on electric fuel pump � MAGS � connect / select magnetos 1, 2 or both (key) � THROTTLE � controls amount of air to engine � MIXTURE � controls ratio of fuel to air � PROP / RPM � adjusts governor to control propeller RPM � FLAPS � increase lift and drag for slow flight � AILERONS � deflect to raise / lower wing for turns � ELEVATOR � deflect to raise / lower nose for altitude � YOKE � controls ailerons and elevator � PEDALS � control rudder (nose wheel steering on ground) � BRAKE � (toe or hand) control speed on ground � PARKING BRAKE � holds brake setting
� ATC � (Air Traffic Control) non-specific � APP � (Approach Control) towered airport arrival � DEP � (Departure Control) towered airport departure � CLC � (Clearance) ATC verbal description of your flight � DEL � (Clearance Delivery) provides your clearance � TWR � (Tower) controls runway(s) for landing or departure � GND � (Ground Control) controls taxiways for ground movement � CTAF � (Common Traffic Advisory Frequency) for non-towered airports � RAMP � non-movement area for aircraft parking � TERMINAL � ramp area and gates for commercial traffic � FBO � (Fixed Base Operator) point of contact for GA aircraft � UNICOM � (Universal Communication frequency) used by FBO � WX � (Weather) listed source of weather information � ATIS � voice recording of current weather and operational procedures � AWOS � (Automated Weather Observation System) conditions updated every minute
� VFR - (Visual Flight Rules) visual (self) separation from other traffic. � MVFR - (Marginal VFR) greater than 1 mi visibility, clear of clouds, visual (self) separation from other traffic. � IFR - (Instrument Flight Rules) no visual traffic separation, ATC control. � VMC - (Visual Metrological Conditions) 3 mi or more visibility, able to maintain 500 ft above, 1000 ft below clouds. � IMC - (Instrument Metrological Conditions) less than 1-mile visibility, visual separation not possible.
� AIRSPEED � (Knots or MPH) speed relative to the surrounding air � GROUND SPEED � (Knots or MPH) speed relative to the ground � V-SPEEDS � critical speeds (Velocities) for your aircraft � see POH � AOA � (Angle of Attack) the angle between the wing cord line and the relative wind � STALL � speed or angle of attack at which the wing is no longer producing lift � HEADING � direction the aircraft is pointing � VECTOR � heading assigned by ATC � ALTITUDE � your height above mean sea level (MSL) � AGL � (Above Ground Level) your height above the surface � ALTIMITER � indicates correct altitude when set to local barometric pressure � PATTERN � standard path to fly when landing on a runway � LH/RH PATTERN � direction of turns in the pattern, left turns standard � TPA � (Traffic Pattern Altitude) typically 1000 ft AGL � DEPARTURE � path straight ahead on departure to TPA � CROSSWIND � path 90 degrees from departure at TPA � DOWNWIND � path parallel to runway in opposite direction at TPA � BASE � path 90 degrees to final, descending from TPA � FINAL � final descent path in line with runway � GO AROUND � rejected landing, continue departure to traffic pattern
� COMM 1- main radio for communication � NAV 1 � main radio for navigation � VOR � (Very high frequency Omni directional Radio beacon) ground-based navigation system � RADIAL � discrete beam from VOR � FSS � Flight Service Specialist � BRIEFER � FSS source for flight notices and weather � NOTAM � (Notice to Airmen) warning of risk or changes � TFR � (Temporary Flight Restriction) may appear with short notice � FLIGHT WATCH � (122.0 Hz) access to FSS while airborne � EMERGENCY � (121.5 Hz) monitored 24/ 7 by ATC � TRANSPONDER � sends code and altitude for radar identification � SQUAWK � discrete transponder code assigned by ATC for your flight (1200 = VFR) � GPS � (Global Positioning System) satellite-based navigation � FLIGHT PLAN � entered in GPS, automatic sequence to next waypoint � WAYPOINT � progressive locations along your route of flight
|
||||||||||||